How to Remove Car Mat Creases? [Step by Step Process]
Your car mat is an important accessory and should be always be kept neat and presentable. It is designed to keep your car carpet clean by holding mud and other forms of dirt from your shoes when you get into the car.
It also prolongs the life of your car carpet by reducing the wear and tear caused by the regular movement of the feet.
One of the major challenge you will deal with about your car floor mat, whether brand new or old are creases. Creases cause your mat to lose shape and appear rugged. The mat may also tear along the lines of creases.
Why do Curls form on the Car Floor Mat?
It is important to know why folds will form on your mat so that you avoid at least some of them. As a matter of fact the fewer the folds the longer your mat will last. Creases appear due to a number of reasons and here are the common ones.
- Wrongly positioning the edge of a mat in a hidden corner so that it is not noticed for sometime
- Use of an oversize mat that stretches beyond the surface which in turn forces you to fold it a bit
- Folding it for storage or packing over sometime
- Packing the car for some time with some weight on a wrongly placed mat.
- Machine washing it. With all its speed and efficiency, washing your car mat with the washing machine over time may leave it with some creases.
As you can see from this list, it is inevitable that your car mat will develop some creases at some point.
The good news is you can get rid of these unwanted creases to keep your mat neat and presentable.
How to Remove Car Mat Creases?
Cleaning Tools and Materials Required
For effective un-creasing of your mat, assemble an iron box for steaming, water sprayer, water, a firm brush, a towel, and a flat object or a heavy stack of books.
Steps to Follow to Remove Car Mat Creases :
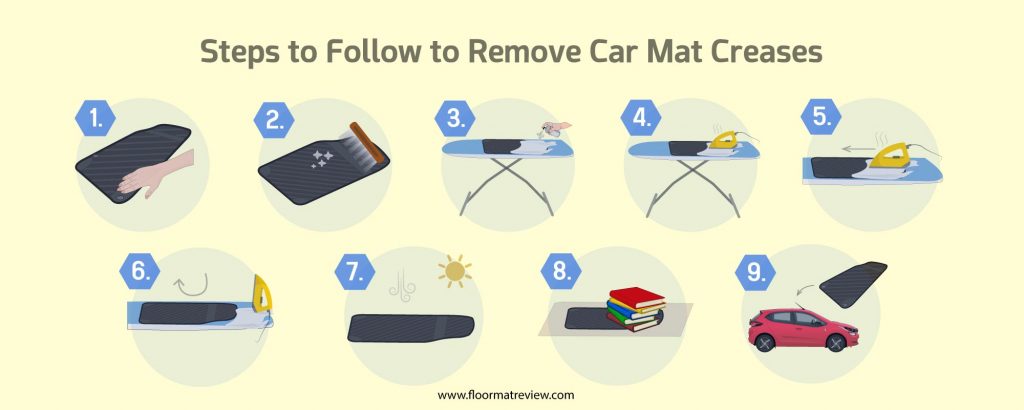
The best thing about your car mat is that it is easy to remove and return. Following these steps will eliminate creases from your car floor mat.
- Get the car mat ready for un-creasing. If it is a new mat, remove the packaging material and lay it flat. Should it already be in the car, gently hold the corners and remove the mat?
- Remove any dust or other particles on the mat to ensure that it is clean before starting.
- Lay the mat flat on the ironing board. Ensure that you position the creases facing upwards. Place a moist thick cloth or towel on the mat. Sprinkle some water to make it tender and responsive when pressed with the iron.
- Prepare the iron by connecting it to the power supply and setting it on a high steaming temperature.
- Press and move the iron on the wet cloth covering the mat allowing it enough time to dry the cloth and at the same time straighten the creases on the mat. Do this repeatedly on all the creases until they are all straightened up.
- Turn the mat upside down and roll it while holding it tightly
- You now need to expose it to indoor or outdoor heat. If it is sunny, the sun heat is your best source of heat to completely flatten the mat. Turn the mat over the other side for uniform flattening of its material.
- Place the mat on the floor and add some heavyweight to it. A flat object or a stack of heavy books will do.
- After a few minutes, place the mat back in the car ready for use.
Final Wrap
Removing creases is something you need to do any time you spot them. Not cleaning it will mean a bad shape and less durability. Persistent creases at the same place will at some point tear the mat along the creases.
Hence it is of utmost importance to keep a keen eye on any folds that may develop and plan on removing them.