How to Extend the Life of a Self-Healing Cutting Mat?
A self-healing mat is one that heals itself. These mats use a new technology called “smart materials”. They repair the cuts in the mat as if by magic but it’s the scientific materials that act like our own biological system that promotes healing after something has been wounded.
They last longer because the cuts left by the blade automatically close and eliminate the need to replace the mat often.
Eventually, you will have to replace the mat but it depends on a number of things. See how to extend or prolong the life of your self-healing cutting mat below.
How to Use Self Healing Cutting Mat?
The best uses for a self-healing cutting mat include crafting, quilting, graphics design, hobbyist, card making, scrapbooking, and several other uses.
1. Usage
- If you are a quilter, you probably use a rotary blade to cut your fabric squares. You don’t want to cut on just any surface since damage will occur. So first, when you use a self-healing cutting mat as your cutting surface, any gouges on the surface left by the blade automatically close up. That effectively eliminates the need to replace your cutting mat ever again, except if you need something larger or with more features.
- Secondly, with continual use and without a self-healing cutting mat your cutting tool will have to be replaced more often. The healing properties of your cutting mat will prolong the life of your rotary cutter and its blade. Imagine the money you can save, and if you are doing this as a business, the increased profits over the long haul.
- Thirdly, the special properties of smart materials will allow for long and straight cuts without any errors. The mat allows for an amount of pressure to be applied which is not available in a cheaper regular plastic cutting mat. Setting eyelet snaps and other types of things are easier using this product. Your project, whether it is a graphic design piece, a quilt, or a craft item, will come out almost flawless.2.
2. Choose the Right Cutting Mat Surface
Glare on a project can affect the consistency of your cuts. Consider that the surface of the cutting mat has a matte finish and the texture is not smooth or your materials will slip off the surface. Choose a cutting mat that has a medium texture and a matte finish for best results.
3. Proper Cutting Mat Size
Cutting mats range in size, try and pick the largest mat that fits your work and storage areas. If you are cutting pattern pieces, you will need a full-size cutting table mat.
If you are quilting, a fabric cutting mat 24” in length or larger will provide greater accuracy by allowing you to cut strips across the fabric in one fold as the fabric size is 42” across and when folded is 21” which will fit nicely on your 24” mat.
However, if you are transporting your mat a lot or are a beginner starting with a 12”x18” mat may be a better option. Oversize or large cutting mats are available up to 6 feet by 12 feet.
4. Using the Right Tools
A rotary cutter or utility knives are often used to cut materials on a cutting mat. A self-healing mat aids in keeping your rotary cutter and utility knife sharp but remember to change the blades often. A dull knife can leave a permanent knife mark on the surface of your mat.
5. Cutting Mat with Graduations
It is important to have a mat that is graduated and numbered on all four sides of the mat. These graduations help with alignment. If possible get one that has the hash lines extending past the mat board on all four sides.
Important Tips to Extend the Life of Self-Healing Cutting Mat
Your cutting mat will eventually wear out but follow these few tips to extend the life of your mat.
- Select a professional grade mat to ensure that it can take repeated cuts without gouging.
- Always ensure that you are using a sharp cutting blade, change the blade often, as this minimizes the chance of leaving a permanent mark on the plastic surface.
- To avoid making the same cuts on your mat, rotate your mat often.
- Clean your cutting mat often. Use an all-purpose cleaner or mild detergent with warm water.
- Avoid abrasive cleaners they can scratch and remove the markings on your map.
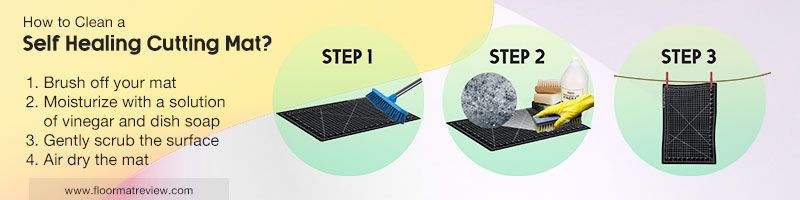
How to Clean a Self Healing Cutting Mat?
You’ve just spent a lot of time and money on your mat, so it deserves the best care.
- Remember to periodically brush off your mat with a scrubber in order to release any loose threads that get caught! You don’t need to be too forceful, just give the surface of your mat a light touch.
- Remove any loose threads and fibers and moisturize your mat with a solution of vinegar and dish soap. Keep it soaked in the solution for 10-20 minutes and it will do the job. It will remove any stains on the mat.
- To make the solution Use 1/4 th cup of White vinegar in approximately 4 liters of cold water. Don’t use hot water.
- Bring some mild dish soap-Don’t Use any harsh chemicals that will wear away at its fibers! Gently scrub the surface with another soft brush to remove any fibers trapped in the cuts which prevent the mat to self-heal.
- Dry the mat, it is recommended to air dry it. Let it dry in the air and your mat will be ready to use after 24 hours.
How to Store a Self Healing Cutting Mat?
Do not roll them or store them rolled. It is best to lay them flat to store. Direct sunlight can warp your cutting mat as they are heat sensitive. Also do not store in a cold room this can cause cracking.
Conclusion
If you are a graphic designer, quilter, or work in fabric, either as a hobbyist or entrepreneur, a self-healing cutting mat is an invaluable tool for you.
Its self-healing properties will allow you to cut with confidence knowing that your blade will not be quickly dulled and that your cutting surface will be usable for years to come. Use the tips to extend the life of your self-healing cutting mat for years.